Best Bodyweight Exercises, No-Equipment Workout At Home

30 workout moves you can do with no equipment.
1. Cat Cow
How-to: Start on all fours, with your knees underneath your hips and your wrists underneath your shoulders (with fingers pointing forwards). Inhale to drop your belly and point your chest toward the ceiling.
1. Cat Cow (cont.)
How-to: Exhale, tucking your tailbone down and using your abdominal muscles to arch your back towards the ceiling. Lengthen your neck and tuck your chin towards your chest. Inhale back to the stomach-down, chest-up position, and continue moving between cat and cow for 10-15 repetitions in each position.
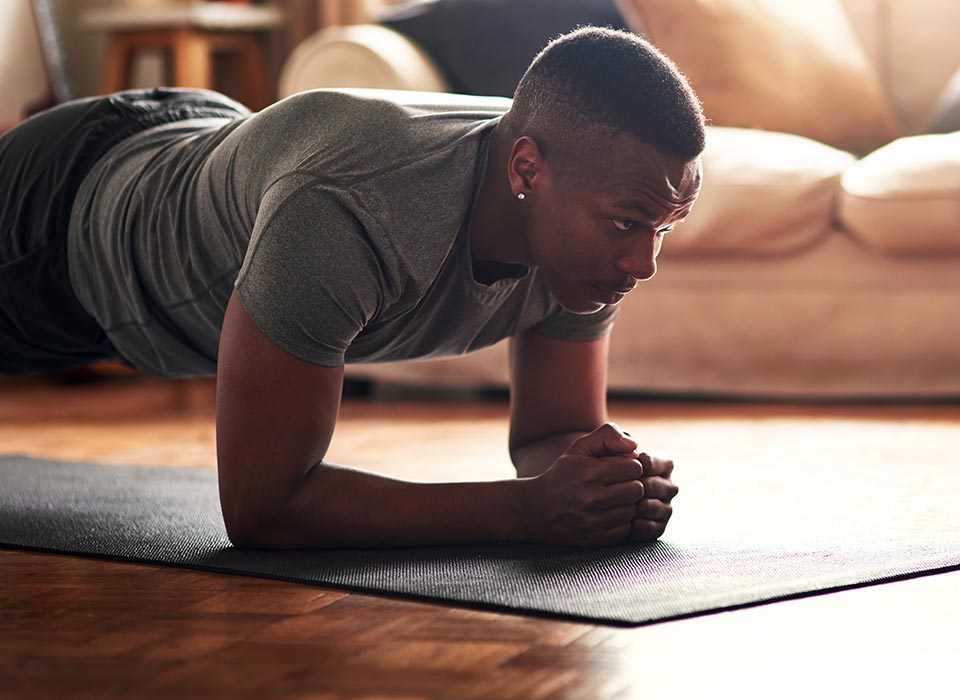
2. The Plank
There’s a secret to a perfect plank you might not know. Ready?
You have to use your butt.
Think about it for sec. You’re holding yourself up on your forearms and toes only. The part of the body that’s farthest from those two points is your booty, which is the heaviest part of anyone’s body (the glutes being the biggest muscles and all). So, as soon as you pop up into a plank, squeeze those cheeks and don’t let go.
How-to: From your stomach, place your forearms flat on the ground, so your elbows are directly below your shoulders. Kickstand one toe, then the other, and clench that tush. Pretend you’re gripping a $100 bill and you don’t want anyone to steal it. Hold for up to a minute, then rest before repeating. (There’s no huge benefit to holding it any longer, because you’ll just get fatigued and lose your form.) Also, forearms are better than hands, because most people’s wrists will give out before their cores will.
3. Up Up, Down Down
How-to: Start in a forearm plank. Carefully pick up one arm and place the hand so it’s right under your shoulder; press up and let the second arm follow, so you’re now up in a straight-arm plank (that’s the “up up” in the name).
3. Up Up, Down Down (cont.)
Lower back down, leading with the same arm, then the other, so you’re back on your forearms (the “down down”). Repeat with the opposite hand leading. Do 10 total (5 each side). The trick: Really engage your glutes and core, so your hips don’t sway or dip side to side.
4. Plank With Hip Dips
How-to: Begin in a forearm plank.
4. Plank With Hip Dips (cont.)
How-to: Keeping your feet planted, rotate your hips to one side, maintaining a hovering position above the ground.
4. Plank With Hip Dips (cont.)
How-to: Right yourself back through center plank, leveling the hips; then, rotate the other hip under you. Do 10 sets.
5. Bird Dogs
How-to: Come down to all fours, hands under shoulders and knees under hips.
5. Bird Dogs (cont.)
How-to: Extend one arm straight forward and the opposite leg straight back, foot flexed. Hold for a moment or several, focusing on making the longest line possible from fingertips to sole of foot while keeping shoulders and hips square to the ground. Bring both limbs back in, not touching down if you can help it, and repeat. The longer you hold the limbs out, the harder it is.
6. Bridges
How-to: Lie on your back, arms along your sides. Bend your knees and place your feet flat on the floor, heels as close to your butt as you can get ‘em.
6. Bridges (cont.)
How-to: Press your feet hard into the floor (don’t let the heels pop up), and squeeze your glutes to lift your hips up, so they’re fully extended and your body forms a straight line from shoulders to knees. Hold for a few seconds or longer, then lower down for a moment before pressing up once more. Do 10.
7. Chorus-Line Bridges
How-to: Lie on your back, arms along your sides. Bend your knees and place your feet flat on the floor, heels as close to your butt as you can get ‘em.
7. Chorus-Line Bridges (cont.)
How-to: Press your feet hard into the floor (don’t let the heels pop up), and squeeze your glutes to lift your hips up, so they’re fully extended and your body forms a straight line from shoulders to knees. Shift your weight into one foot so you can pick up the other, extending it so that the leg is straight and the thighs are still parallel.
7. Chorus-Line Bridges (cont.)
How-to: Now, go from bent knee to straight knee without anything else changing — at all. Replace that foot right next to the other one, then shift and extend the second leg in the same way. Repeat for 10 sets (both legs = 1 set).
8. Side Planks
How-to: Lie on your side, elbow bent and aligned under the shoulder, and forearm perpendicular to the body. Stack your feet and bend your knees slightly.
8. Side Planks (cont.)
How-to: Press the side of your foot into the floor to pop up, so you’re resting on that foot and the forearms; extend the top arm along your body (easier) or up to the sky (harder). If this is too tough to hold for at least 10 seconds, come down and bend the lower leg; pop up again so you’re resting on the side of the knee and the forearm. If the straight-leg version is too easy, lift the top leg up and hold it in the air.
9. Plank To Side Plank
For this one, you’ll be on straight arms, so take care with your hand placement to protect your wrists — or even come up on a fist if your wrists don’t like being bent.
How-to: Start in a straight-arm plank, hands right under shoulders and glutes squeezed. Have your feet about hip-width apart.
9. Plank To Side Plank (cont.)
How-to: Rotate to one side, lifting the opposite arm up to the sky and rolling onto the edges of your feet. Try to move as one unit, in a straight line from head to toe, not letting the hips drop at all. Do 10 reps (side-to-side is one).
10. Walkouts
How-to: Start standing.
10. Walkouts (cont.)
How-to: Hinge at the hips to place the hands on the floor (bending your knees if you need to).
10. Walkouts (cont.)
How-to: Take small steps forward with your hands until you’re in a straight-arm plank, hold for a moment, and then walk your hands back to your feet. Roll up to stand and repeat 10 times.
11. Russian Twists
How-to: Lie on your back, knees bent and feet flat on the floor. Clasp your hands, fingers interlaced, and pull your bellybutton in toward your spine to lift your shoulders up off the ground.
11. Russian Twists (cont.)
How-to: Move your clasped hands to touch the outside of one hip, but keep your shoulders broad and square, resisting the urge to let your waist twist. Move your hands to the opposite hip, maintaining your form and not letting your shoulder blades drop. Repeat 10 times. Too easy? Hold a medicine ball or weight in both hands and move it from hip to hip instead.
12. Leg Raises
How-to: Lie on your back, placing your hands underneath the sacrum (lowest part of the spine). Keeping your back flat, raise your feet up toward the sky, ideally straight and together (though a micro-bend in the knees is cool, too).
12. Leg Raises (cont.)
How-to: With control, keep the legs extended and lower them slowly, as one unit, toward the ground — stopping the moment you feel your lower back wanting to pop off the floor. Hold and hover the legs for a moment; then, raise them back up to the sky. Do 10 reps. The slower you go on the raise and the longer you hover, the harder it is.
13. U-Ups
How-to: Lie on your back, arms on the ground overhead, legs straight.
13. U-Ups (cont.)
How-to: Simultaneously raise your arms so the fingers and toes are pointed toward the sky, forming right angles with the torso. Keep the head down.
13. U-Ups (cont.)
How-to: Slowly extend both your arms and legs out at between a 30- and 45-degree angle to the ground (don’t let the lower back pop up). Hold; then, bring back together at 90 degrees. Do 10.
14. Windshield Wipers
This one trains the obliques in particular to hold stable even as they want (desperately) to twist. Start with a small movement and get bigger with the windshield-wiper action as you get stronger.
How-to: On your back, place your arms flat out on the ground like a T. Raise your legs up, feet to the sky.
14. Windshield Wipers (cont.)
How-to: Keeping your legs glued together, lower them slowly to the side, going only as low as you can control without your hip lifting off the ground.
14. Windshield Wipers (cont.)
How-to: Bring your legs back to center, then over to the other side. Do 10 sets. If keeping the legs straight isn't happening yet, bend your knees.
15. Superman
How-to: Lie on your stomach on the floor, arms extended overhead.
15. Superman
How-to: Keeping your head neutral (nose toward the floor), squeeze your glutes, back, and shoulder blades to lift your arms and legs up off the floor. Hold for a beat, then lower down.
16. Swimming
How-to: Lie on your stomach, arms extended overhead, neck neutral. Lift up both arms and legs off the floor and alternately raise and lower the opposite arm and leg, kind of like you’re doing a swimming flutter-kick with all your limbs.
16. Swimming (cont.)
How-to: Count 10 sets.
17. Mountain Climbers
How-to: Start in a straight-arm plank.
17. Mountain Climbers (cont.)
How-to: Walk your feet in slightly, so your butt pikes up toward the sky. Pick up one foot and drive your knee in toward your chest; then, quickly replace that foot and drive the other one up.
17. Mountain Climbers (cont.)
How-to: (It’s kind of like running in place with high knees, but your hands are on the ground.) Too much for your shoulders? Place your hands on a bench or another slightly elevated surface.
18. Straight-Arm Plank
If this one really bugs your wrist, take breaks; your wrists won’t get stronger if you don’t at least try.
How-to: Start from hands and knees.
18. Straight-Arm Plank (cont.)
How-to: Squeeze your glutes and press your palms firmly into the floor. Hold for no more than a minute. Align your shoulders directly above your wrists. Straighten one leg, lifting your body up.
18. Straight-Arm Plank (cont.)
How-to: Then, straighten the other.
19. Kneeling Side Plank
How-to: Lie on your side, with your elbow underneath your shoulder and your forearm perpendicular to your torso.
19. Kneeling Side Plank (cont.)
How-to: Bend the bottom leg at the knee, such that the thigh forms a straight line with the torso and the lower leg is behind you. The top leg will be straight, with the arch of the foot resting lightly on the floor.
19. Kneeling Side Plank (cont.)
How-to: Lift your hips up so that you’re balanced on your forearm and knee, squeezing the glutes and pressing down in the arm to lift the hips, without sagging in the upper body. Hold for 30 seconds to a minute; then, switch sides.
20. Plank With Toe Lifts
How-to: Begin in a solid forearm or straight-arm plank. (Don’t forget to squeeze those glutes!)
20. Plank With Toe Lifts (cont.)
How-to: Carefully lift one foot off the ground, no higher than hip-height, taking care not to allow the torso to shift or the hips to dip. Hold for a second; then, lower that foot and raise the other.
20. Plank With Toe Lifts (cont.)
How-to: Alternate for up to a minute.
21. Front Plank With Reach
How-to: Firm up your forearm plank.
21. Front Plank With Reach (cont.)
How-to: Pick up one arm and fully extend it forward, so your elbow pit is aligned with your ear.
21. Front Plank With Reach (cont.)
How-to: Carefully replace that arm — with your elbow directly under your shoulder — and reach with the other arm. Alternate sides for up to a minute. You will probably need to shift your weight a little to accomplish this, but you want to make sure you’re keeping your shoulders parallel to the floor.
A make-it-(slightly)-easier trick: Space your feet a bit wider than hip-width on the floor. And, yes, keep those glutes engaged the whole time.
22. Plank With Hand & Foot Reach
How-to: Start in either a forearm or straight-arm plank.
22. Plank With Hand & Foot Reach (cont.)
How-to: Simultaneously raise one arm and one leg straight out, so they maintain the same plane as your back — all while holding your hips and shoulders level.
22. Plank With Hand & Foot Reach (cont.)
How-to: Replace the limbs on the ground, reset yourself, and raise the opposite sides. Repeat for up to a minute.
23. Reverse Plank
How-to: Recline on your back with your forearms on the floor and parallel, elbows under shoulders.
23. Reverse Plank (cont.)
How-to: Dig your heels into the floor, feet flexed, and squeeze your butt to lift your hips up off the floor. Your entire body should form a solid, straight line from heels to shoulders. Start with brief holds — 10 seconds — and work your way up to longer ones. Make it harder by coming up to straight arms, though skip this variation if you have shoulder issues.
24. Side Plank Tick-Tocks
How-to: Pop up into a forearm plank, feet stacked on top of each other.
24. Side Plank Tick-Tocks (cont.)
How-to: Level one is to lift and lower the top leg, raising it just a few inches — and never so high that it breaks the plane created by the side of the torso. Got that? Take it next-level by moving that top leg in front of the bottom, tapping the toe on the floor, then raising it up and over the bottom leg to tap behind you. Repeat up to a minute, then rest. Don’t forget to switch sides.
25. Thread-The-Needle Side Plank
Your hand is the thread. Your side makes the needle’s eye. Got it? Eh, read on.
How-to: Get into a forearm side-plank.
25. Thread-The-Needle Side Plank (cont.)
How-to: Extend your free arm straight up to the ceiling, then curl forward and thread your hand through the space created by your side waist and the floor — but (important!) do not let your hip drop down or pike up. Return your arm straight up. Repeat for up to a minute; then, do your other side.
26. Side Plank Elbow-To-Knee (cont.)
How-to: Start in your forearm side-plank, placing your free hand behind your head, so your elbow is winging out to the side.
26. Side Plank Elbow-To-Knee
How-to: Raise your top leg, knee bent, and bring elbow and knee together. Straighten back out and repeat, doing up to a minute’s worth. Then switch sides.
27. Cobra Pose
How-to: Lie face-down on the ground with the tops of the feet pressing into the floor. Place the hands underneath the elbows or slightly forward, and press down into the floor equally from toe to toe.
Lift the chest up away from the ground and roll the heads of your shoulders away from the floor so that the chest can open. Press down through the tops of the feet to root and anchor.
28. Downward Dog
Note: As a beginner, your heels may not reach all the way to the floor, but as long as they're reaching toward the floor, you're doing it right.
How-to: Starting from cobra pose, tuck or curl your toes under and use the strength of the arms to push the hips up and back.
Strengthen through the arms, pressing the hands into the ground and pushing the forearms forward.
Spread the fingers generously, but keep some softness about the webbing. Press down through all parts of the palm, especially the index finger knuckle and thumb, to protect the wrists. Be sure the wrist creases are parallel to the front edge of the mat space — make that your focus, rather than trying to direct any particular finger to point forward.
29. Modified Low Push-Up
How-to: Come to plank pose and place the knees on the ground, right under where they were hovering previously.
Next, slowly bend the elbows until they are in line with the ribs, tracking straight back from the shoulders, so the elbows just barely graze the rib cage and are not trapped underneath it or splaying out to the sides.
Broaden through the collarbones (imagine the sensation of pressing the elbows back in space) to keep the chest open. Roll the shoulder and head up, away from the ground.
30. Child's Pose
How-to: From a kneeling starting position with the knees on the floor, sit the hips back to the heels and ground the forehead to a block, blanket, or to the mat. If you’re working with a knee injury or sensitivity, place a blanket underneath the knees to protect them from the hardness of the floor, or roll a blanket or place a bolster between the calves and thighs to increase the angle of the knee joint.
The Free Home Gym: Bodyweight Exercises You Can Perform At Home

Best Bodyweight Exercises, No-Equipment Workout At Home
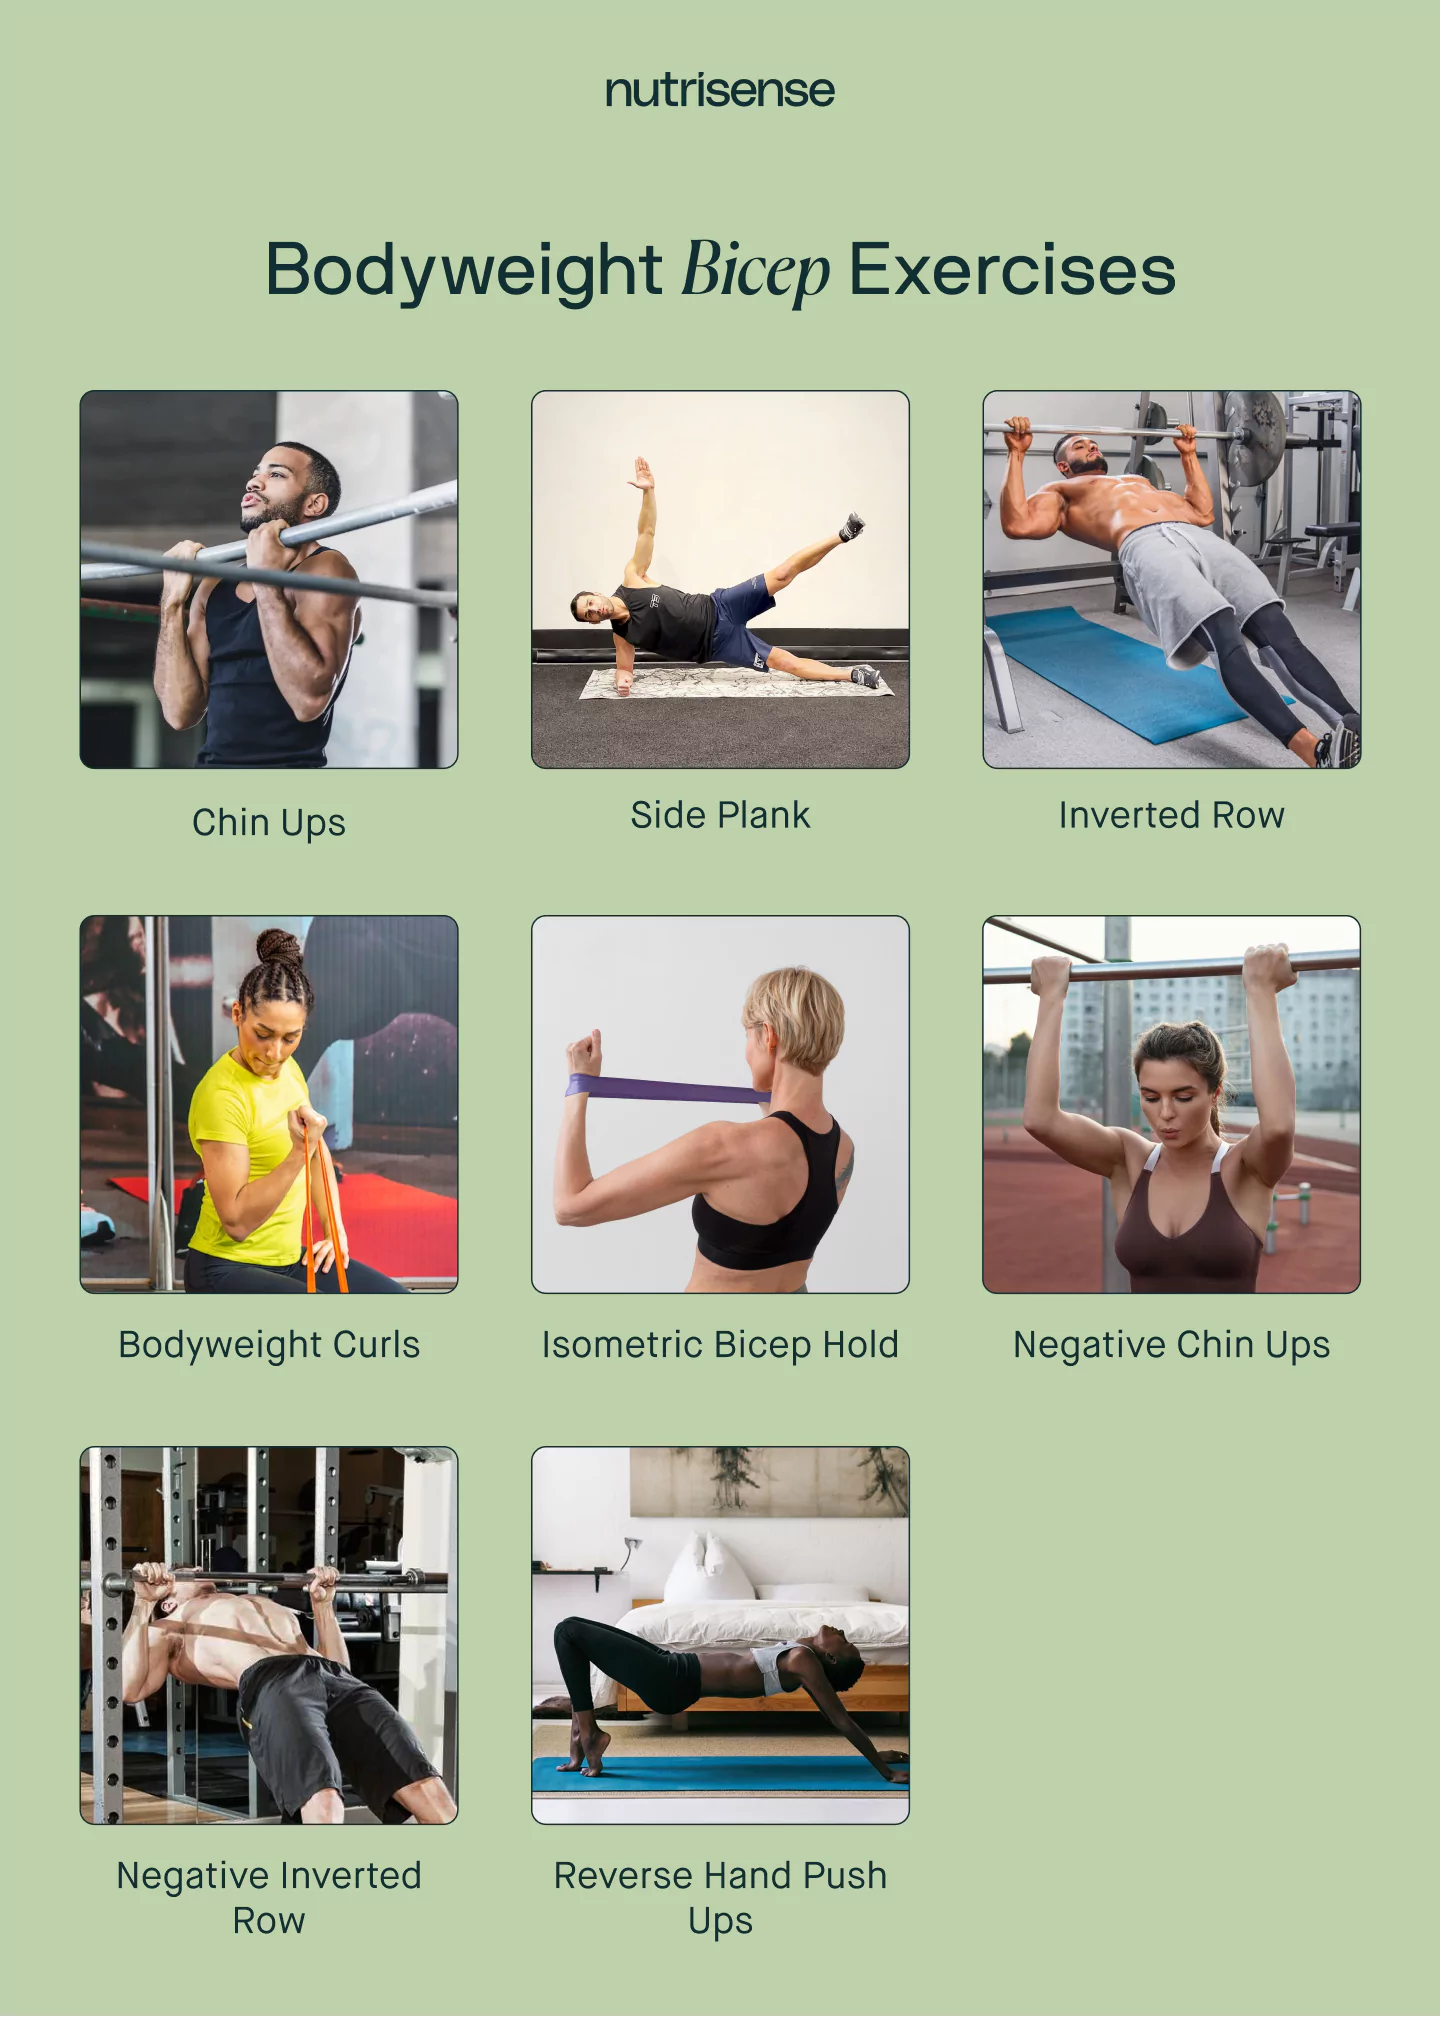
8 Best Bodyweight Exercises for Biceps and Triceps - Nutrisense Journal

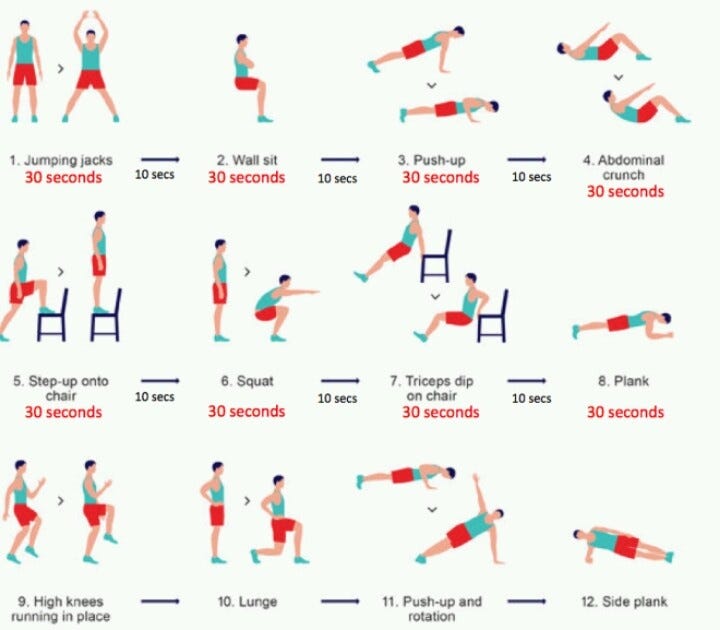
No-equipment gravity (push-up) bodyweight workout for all fitness levels. Visual guide: print & use.

Do These Best Bodyweight Exercises At Home To Build Muscle And Strength: No Equipment Needed!, by Dennis Kiplimo
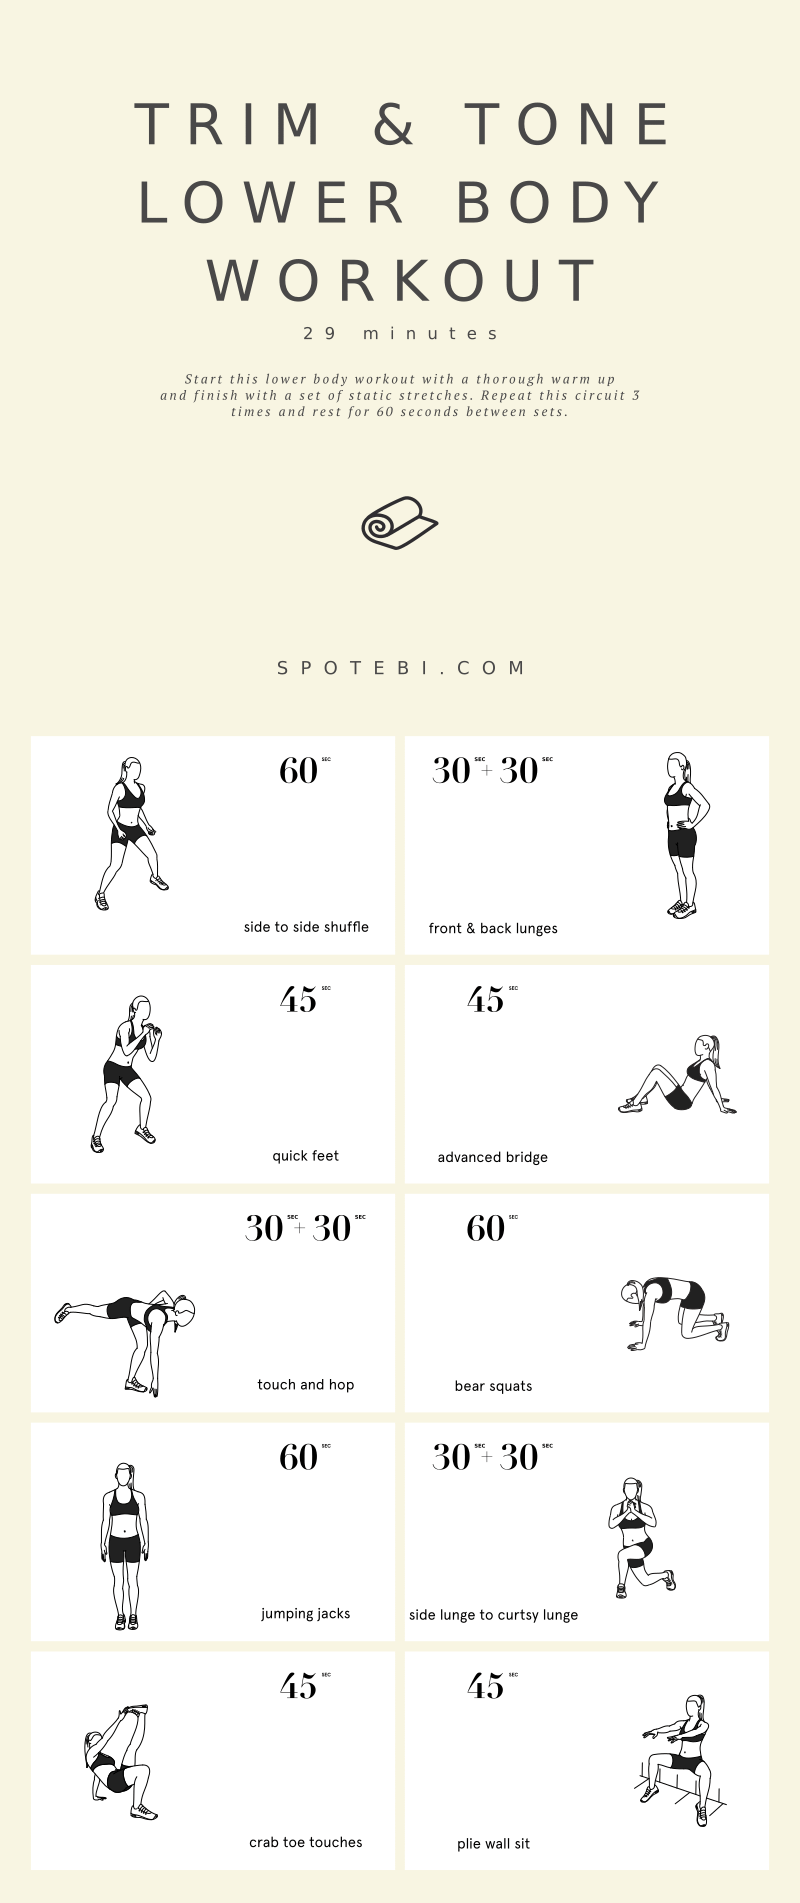
No-Equipment Lower Body & Cardio Exercises

Bodyweight Shoulder Workout (No Equipment Allowed!)

10 MIN BODYWEIGHT WORKOUT (NO EQUIPMENT HOME WORKOUT!)
35-Minute Low Impact Cardio (Video)

The MOST EFFECTIVE BODYWEIGHT LEG WORKOUT, At HOME

15 Glute-Firming Workouts that Rely on Your Bodyweight
10 Simple Bodyweight Exercises for a Full-Body Workout at Home